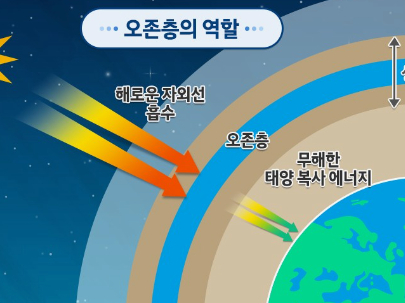
지구의 보호막, 오존층: 우리의 생존을 지키는 특별한 층 Posted by By Jerry Phillips 4월 15, 2024 지구의 대기 중에는 오존층이라고 불리는 특별한 층이 있습니다. 이 오존층은 우리 행성을 위협하는 유해한 자외선으로부터 우리를 보호하는 역할을 합니다. 이번 글에서는 오존층에 대해 자세히 알아보고, 그 중요성과 보호에 대해 살펴보겠습니다.…
우리가 직면한 지구의 환경적 위기와 해결책 Posted by By Jerry Phillips 4월 4, 2024 안녕하세요, 여러분! 오늘은 우리가 살고 있는 행성 지구의 환경에 대해 이야기해보려고 합니다. 최근 몇십 년 동안 우리는 지구의 자연 환경에 많은 손상을 입히고 있으며, 이에 따른 여러 문제들이 발생하고 있습니다.…
지구의 놀라운 이야기: 우리가 알아야 할 것들 Posted by By Jerry Phillips 3월 28, 2024 1. 지구의 형성 지구의 탄생은 약 46억 년 전으로 remp진화적 인 과정이 끝났습니다. 지구의 형성은 우주 공간에서 무수한 별들이 충돌하고 농축되면서 시작되었습니다. 이 과정에서 우리가 알고 있는 지구가 형성되었으며, 이…
지구의 탄생과 진화: 우주의 신비를 탐험하다 Posted by By Jerry Phillips 2월 15, 2024 안녕하세요, 오늘은 인류의 존재와 생명체의 탄생에 영향을 미친 지구의 탄생과 진화에 대해 알아보려고 합니다. 지구의 역사는 우주의 신비로 가득 차 있으며, 그 과정을 탐험해보면 우리의 삶과 우주의 연결을 더욱 깊이…
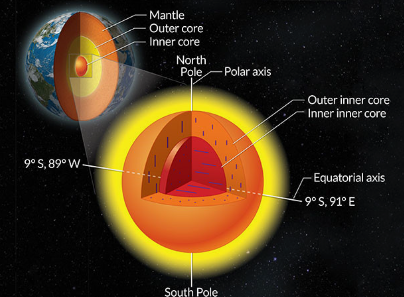
지구의 핵: 심층에 숨겨진 엄청난 에너지의 원천 Posted by By Jerry Phillips 2월 7, 2024 지구의 핵은 지구 내부의 깊은 곳에 위치한 고온과 고압의 환경에서 발생하는 엄청난 에너지원입니다. 이번 글에서는 지구의 핵이 무엇인지, 그 구조와 작용 원리, 그리고 그 중요성에 대해 알아보겠습니다. 1. 지구의 핵…
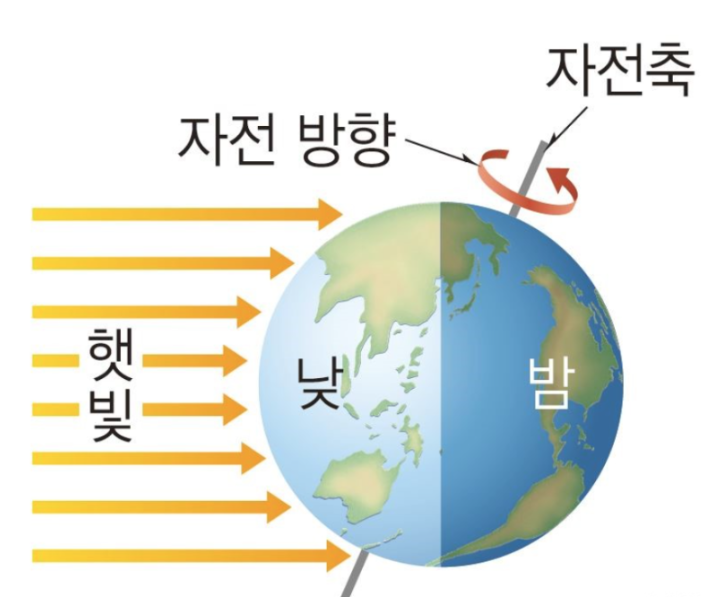
지구의 운동, 그 신비로운 춤 Posted by By Jerry Phillips 1월 25, 2024 1. 지구의 자전: 일상적인 회전 1.1 지구의 힘과 자전의 기원 지구는 자전하면서 자신의 축 주위로 회전합니다. 이러한 자전은 지구가 초기에 형성될 때의 운동 에너지로부터 나온 것으로, 행성의 초기 기운과 자전을…
탐험의 대상, 지구의 비밀: 무한한 수수께끼를 향한 여정 Posted by By Jerry Phillips 1월 25, 2024 1. 지구의 기원과 탄생 1.1 우주의 비밀 속에서의 탄생 우리 행성은 어떻게 탄생했을까요? 우주의 거대한 신비 속에서, 태양계의 중심에서 우리의 작은 고향이 탄생했습니다. 놀라운 우주의 힘과 조화 속에서, 지구는 자신만의…
지구: 우리의 고향, 신비로운 행성의 여정 Posted by By Jerry Phillips 1월 25, 2024 소개: 지구, 우리의 고향이자 유일한 생존 가능한 행성으로, 무한한 신비와 아름다움이 숨겨져 있는 곳입니다. 이 블로그에서는 지구의 다양한 측면과 흥미로운 사실들, 그리고 여전히 풀리지 않은 수많은 수수께끼들에 대해 자세히 알아보겠습니다.…